Recently, Team AGACAD has made quite a lot of significant changes in its Framing software for Revit to automate your work even more yet still provide flexibility. Who wouldn’t want to create and use different Detail configurations for the same Wall Type; calculate Gravity Points for Wall, Floor, or Roof panels; or customize complex dimensions with completely new Smart Dimensioning technology? You’ll be able to do all that and more!
Read on to find out the benefits of the enhanced versions of Wood/Metal Framing Wall+, Floor+, and Roof+.
- From now on, rules for details are separate from the Frame Configuration, giving you much more flexibility. Previously, you had to predefine detail distribution rules for each and every frame configuration one by one, even if they were identical. Also, you couldn’t make multiple detail configurations for one wall type. Luckily, that has now changed.
With the new, automated Detail distribution function, you’ll be able to create a configuration for Details only and use it on various Wall Types. Conversely – you’ll also be able to use different Detail Configurations for the same Wall Type.
All Detail Configurations have been moved to the Add Elements menu:
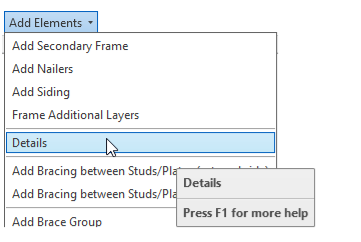

Here you’ll be able to create Detail Configurations separately from the Frame Configurations…

…and distribute them with much more flexibility.
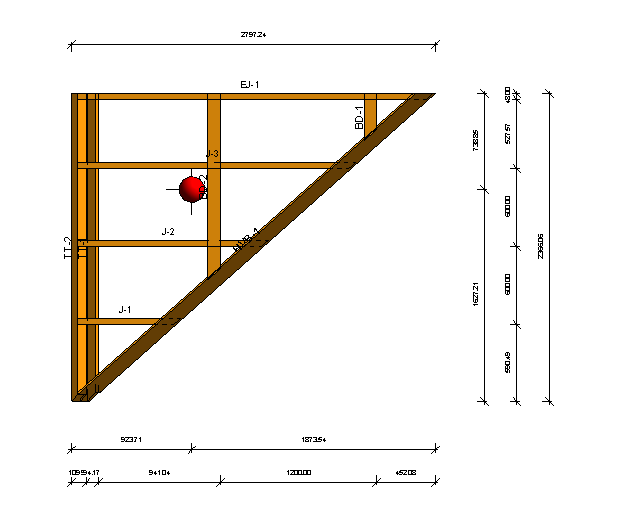
For example, here I’ve used different Detail Configurations for the first-floor wall and the second-floor wall because I needed different details on the top plates:

Of course, you can modify and update your configurations at any time.
If you need to add Details the old-fashioned way – together with the Wall Frame – you can still do that. You just have to make sure that the Detail and Framing Configuration names are the same and tick “Add Details with ‘Frame Wall’ Command” in the Framing Configuration. However, we recommend adding them separately. To do that, just toggle the tick mark ‘off’:

- Thanks to the enhanced Wood Framing software, you’ll be able to add customizable, complex dimensions with completely new dimensioning technology – Smart Dimensions.


Although in the past you could also add dimensions to your shop drawings automatically, with Smart Dimensions, you can configure them from the simplest variation, where dimensions will be added only to a predefined layer, to more complex variations, where all layers will be dimensioned.
With Smart Dimensions, you’ll be able to automatically dimension Structural Framing elements, Point Based elements, Parts, Columns, Walls, Floors, Grids, Ducts, Pipes, and much more.
All you have to do is predefine the rules in the configuration, which can be saved and used in later projects:

And your frames will be dimensioned automatically:

The whole process is straightforward and user-friendly, as you don’t have to set all the dimensioning rules in the configuration and create the assembly in order to see the final result, as in days of yore. Instead, you can use the “Dimension Elements in View” function, and the dimensions will be added to the chosen configuration. Then, if you will feel the need to make any changes, just use “Modify Dimensions.” Do this until you reach the desired result, and all future views will be dimensioned according to your modified configuration, as all changes are saved.
- Insert Gravity Point – this new option has also been added to the Wood Framing software.
Just tick “Insert Gravity Point (GP)” in the Shop Drawing Configuration. You can also control its visibility for each view in the “GP is Visible” column.

Here, the Gravity Point has been inserted in a Wall Assembly:

And here it is in a Roof Assembly:
- Another enhancement to the Wood Framing software is the ability to Rotate Views. It’s extremely useful if you need the joists to be displayed in another direction when creating Floor or Roof panel assemblies.
View of Floor Assembly (not rotated):

View of Floor assembly (rotated 90º):
- Finally, you’ll be able to create several identical assembly views. That means you can use the same View Template for, let’s say, two Frame Front views or sections, and then add different dimensions to them. In the past, the views had to be different, so you had to, for example, duplicate View Templates in order for them to have distinct names. Thanks to the “View Number” Column, however, Views can be identical – all you need to do is number them:

“Frame&Sheathing Front” View with dimensioned Frame:
“Frame&Sheathing Front” View with dimensioned Sheathing:

Get the software update, and benefit from these enhanced features right away!
FRAME MY PROJECT
Interested in our Wood and Metal framing software? An excellent way to evaluate it is via our new “Frame My Project” service. After you download a free trial of our framing software (metal or wood), take advantage of this special service. It’s a real deal.
For a fixed fee, our BIM application engineer will log on to your PC and spend an hour framing your very own project. Sit back, watch, learn, and ask questions while your frame takes shape! Our engineer will take you through all the functionality our powerful software has to offer and share best practices. Our BIM application engineers have experience in the real-world, not just theory.
REGISTER HERE to start framing with our expert. With “Frame My Project” you get an hour’s worth of your project expertly framed, your questions answered.