 We are back on track! One more post in the BIM Tree Chimpanzee series and one more workflow for our blog readers and followers.
Today, I would like to discuss BIM development by going through BIM stages. Hopefully most of BIM users are familiar with LOD, but for those who are not – I will briefly introduce this term. As one of the most contributive organizations in BIM development, buildingSMART international provides this description of LOD: “The Level of Development (LOD) Specification is a reference that enables practitioners in the AEC Industry to specify and articulate with a high level of clarity the content and reliability of Building Information Models (BIMs) at various stages in the design and construction process”. LOD is divided into 6 stages that comply with the standard: LOD 100 – Concept (or Pre-Design), LOD 200 – Design Development (or Schematic Design), LOD 300 – Documentation (or Design Development), LOD 350 – Construction Documentation, LOD 400 – Construction Stage and the last one, – LOD 500 – As-Built model.
LOD definitions in terms of model elements:

LOD 100: Conceptual, overall building mass indicative of area, height, volume, location, and orientation may be modelled in 3D or represented by other data.
LOD 200: Essentially generic placeholders, model elements are modelled as generalized systems or assemblies with approximate quantity, size, shape, location, and orientation. Non-geometric information may also be attached to the model elements.
LOD 300: Model elements are modelled as specific assemblies accurate in terms of quantity, size, shape, location, and orientation. Non-geometric information may also be attached to the model elements.
LOD 350 (proposed): The model element is graphically represented within the model with the necessary level of detail for cross-trade coordination and construction layout. Non-geometric information may also be attached to the model elements.
LOD 400: Model elements are modelled as specific assemblies that are accurate in terms of size, shape, location, quantity and orientation with complete fabrication, assembly and detailing information. Non-geometric information may also be attached to model elements.
Source: AIA document E202-2008.
LOD only applies to an individual family, not the entire project, due to this statement: the author of the project is responsible for developing the content to the required LOD. As the geometry is only one part of LOD, level of model information (LOI) is related to the non-graphical content of models. During the transition from LOD 200 to LOD 300 and LOD 400, we need to improve graphical and non-graphical parts of the element. As an example, generic models (“no-name” element) should be changed with specific element. All the data gathered during the LOD200 and LOD300 stages should travel together with growing LOD.
Changing elements from one kind to another is possible within Autodesk Revit. Using simple Revit functionality, you can change an element, but all data gathered during the BIM process will be lost instantly.
As an example, if you change the type of an element, then parameters are lost, even if families contain the same parameters:


BIM Tree Manager has special functionality
to replace elements and transfer all necessary parameters:

BIM Tree Manager possesses two Replace Element functionalities – Replace Element (that just replaces families) and Replace Element with Mapping (Changes the family and transfers the parameters). Let’s leave Replace Element functionality and sprightly jump to Replace Element with Mapping:
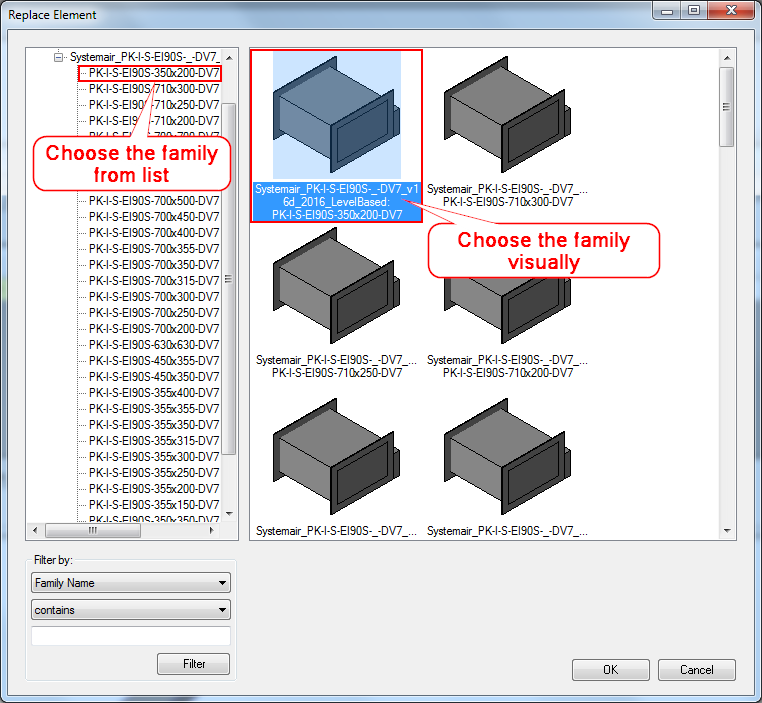
First of all, the user has to choose the family of the element that he wants to replace. There are some mandatory requirements that have to be met before replacing a family. (Basically, everything is just like in simple Revit):
- Category of the elements must be the same (the tool won’t recognize random categories)
- Families must have the same type of host
- Families must be created in the same position with respect to the reference point
- Pipe, Duct, Cable Tray, Conduit connectors must be at the same position as the previous element to keep elements connected.
After choosing the replacement family, you can choose parameters for the current family. Please add needed parameters from Available Parameters (left side of the dialog window) to Selected Parameters (right side of the dialog window).
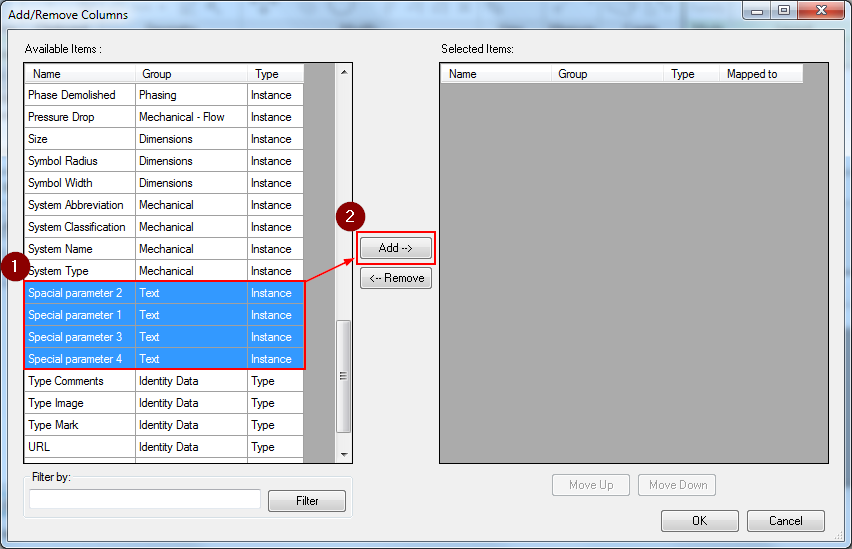
After parameters are added to the right side, you can choose parameter mapping. You should choose parameters from the family that is replacing the previous one. Parameters must be already created in your families!
P.S. The fastest way to add parameters is to use Smart Browser software from AGACAD portfolio. You can review the short video on “How to add Shared Parameters to Families”.

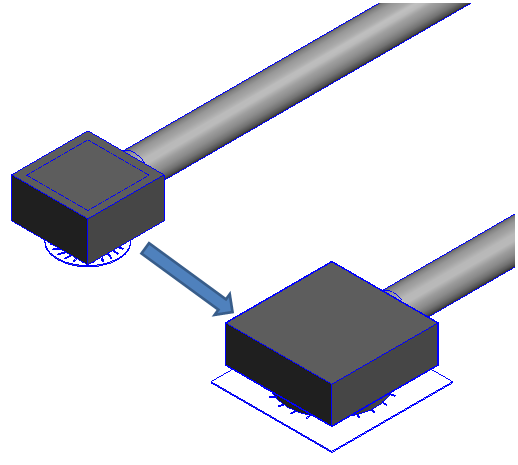
After these steps are done, you have filled the parameters with the same values as the previous ones had.

This can be done with any family that meets the requirements listed above. I will show a few examples:
- Duct Accessories:

- Pipe Accessories:

- Air Terminals:
- Mechanical Equipment:

- Electrical Equipment:

- Lighting Fixtures:

This is just one of many helpful features of AGACAD’s advanced solution  that will help you save time while still using BIM models to their full potential.
Go ahead and download a FREE TRIAL and experience its benefits yourself. You can even request a live demo with our BIM Application Engineer.
 BIM TREE CHIMPANZEE series
Related blog posts:
- BIM Tree Chimpanzee – Room Finish Material Schedule / Quantities in Revit®
- BIM Tree Chimpanzee – Room/Space and Host data in MEP elements
- BIM Tree Chimpanzee – Replace Curtain Walls with Windows in Revit®
- BIM Tree Chimpanzee – Transformation from Generic elements (LOD200) to LOD400
- BIM Tree Chimpanzee – Change Type Name and Sort by Parameters
- BIM Tree Chimpanzee – Use Shared Parameters and Sort by ID
- BIM Tree Chimpanzee – Calculate Elevations and Coordinates


